TASOLLER Options How-To Guide
TASOLLER Options How-To Guide
Section titled “TASOLLER Options How-To Guide”1. What is TASOLLER Options?
Section titled “1. What is TASOLLER Options?”- Compatible with TASOLLER PLUS (second-generation product); incompatible with TASOLLER (first-generation product);
- Adjusts the threshold (sensitivity) of GroundSlider;
- Modifies the output delay of GroundSlider;
- Regulates lighting brightness for both Air and GroundSlider;
- Enables switching between multiple operational modes;
- Provides real-time display of current touch-sensing values;
2. Firmware and TASOLLER Options
Section titled “2. Firmware and TASOLLER Options”2.1 January 2, 2025
Section titled “2.1 January 2, 2025”- Official firmware (pre-installed at factory, no longer requiring manual installation) for backup purposes.
- Files ending with “skystar” represent main control firmware;
- Files ending with “cyacd2” denote touch-sensing firmware;
- Firmware upgrade requires sequential installation of both components:
- Step 1: Upgrade the “skystar” main control firmware;
- Step 2: Upgrade the “cyacd2” touch-sensing firmware;
2.2 Steps for burning firmware
Section titled “2.2 Steps for burning firmware”- Open the Options software;
- Connect one Type-C port of TASOLLER PLUS to the computer (the port without the lightning logo);
- Click the “Open” button;
- Find the file starting with skystar file (Files with the suffix skystar is the main control firmware);
- Click to open, and click the “Upgrade” button. It takes about 20 seconds;
- Click the “Open” button
- Find the file starting with Touch (Files with the suffix cyacd2 is the touch firmware);
- Click to open, and click the “Upgrade” button. It takes about 60 seconds;
3. How to use TASOLLER Options
Section titled “3. How to use TASOLLER Options”3.1 Main window
Section titled “3.1 Main window”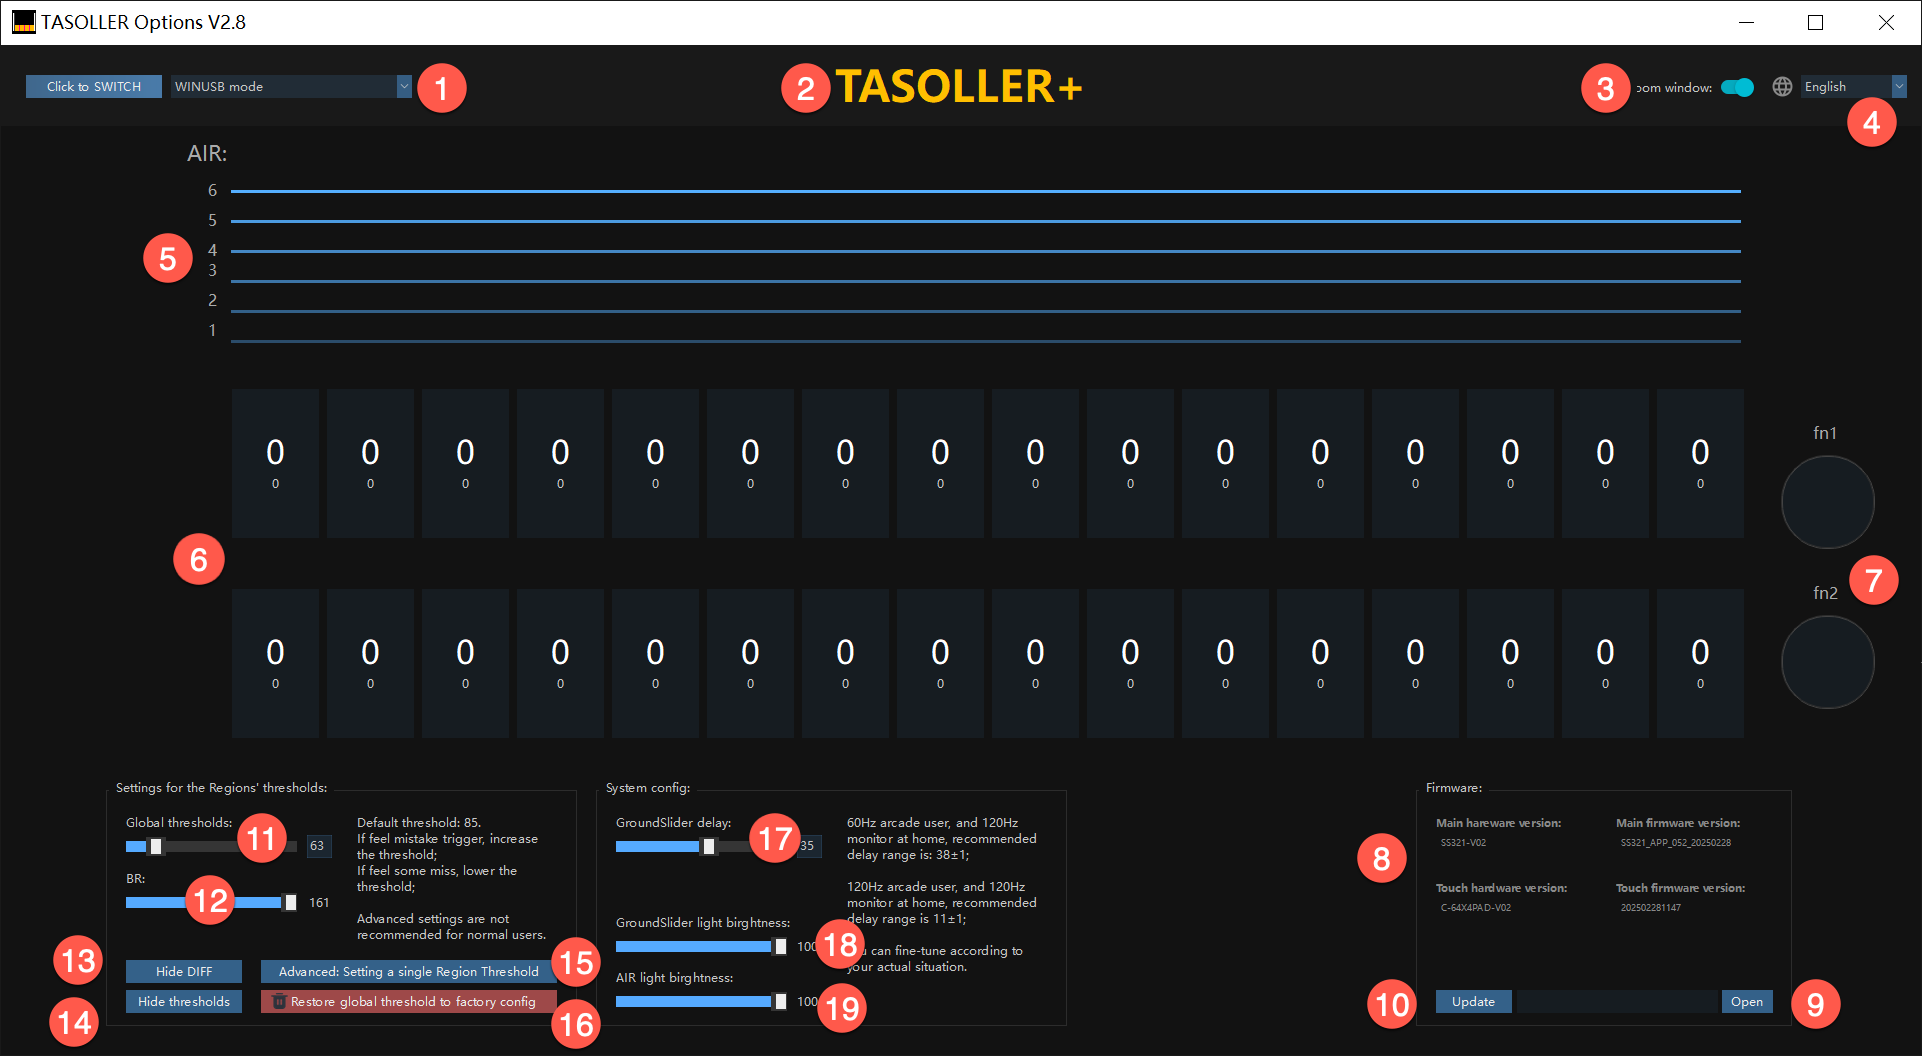
| No. | Function | Technical Description |
|---|---|---|
| 1 | Mode Switch | Optimize operational configurations through intelligent mode adaptation |
| 2 | Controller Linkage Verification | Grey: Controller disconnected Amber: Linkage established |
| 3 | Window Scaling | Active: Native 100% DPI rendering |
| 4 | Language | Real-time multilingual interface adaptation via dropdown menu |
| 5 | AIR Zone | Real-time spatial interaction visualization |
| 6 | Sensor Zone | Numerical representation of current contact surface area (Minimum detection threshold: 20 units) |
| 7 | FN1/FN2 Button | |
| 8 | Firmware information | Display current hardware/firmware version. |
| 9 | Open Firmware | Click the button to select the firmware. |
| 10 | Update | Click to start to update the firmware. |
| 11 | Global Threshold | Setup the same threshold of 32 touch buttons at same time. |
| 12 | BR Value | Tactile response curve modifier (3.1.2) |
| 13 | Raw Data Masking | Diagnostic-level touch signal visualization (Debugging exclusive) |
| 14 | Custom Threshold Masking | Advanced parameter visualization (Debugging exclusive) |
| 15 | Individual Key Calibration | Per-key sensitivity fine-tuning (Recommended for professional calibration scenarios only) |
| 16 | Factory Reset | Full parameter restoration (Critical system reset - non-destructive operation) |
| 17 | Signal Latency | Only affects touch button. If the fast ratio in the game is too high, it is recommended to modify the parameters here first. (Parameter unit is milliseconds) |
| 18 | GroundSlider light brightness | Recommended 70%-100%; |
| 19 | AIR light brightness | Recommended around 70%; |
3.1.1. Overall threshold
Section titled “3.1.1. Overall threshold”If you notice phantom inputs (unintended or accidental triggers caused by oversensitivity), it is recommended to increase the threshold to reduce the likelihood of these false activations.
- The base recommendation is 85;
- If you experience dropped inputs (missed or unregistered triggers due to insufficient sensitivity), lowering the threshold is advised to ensure all intended inputs are recognized.
- For optimal results, it is recommended to adjust the sensitivity settings incrementally by 1-2 units at a time and test after each adjustment to find the ideal configuration for your gameplay.
3.1.2. BR value (related to unintended or accidental triggers and sticking keys)
Section titled “3.1.2. BR value (related to unintended or accidental triggers and sticking keys)”- Set to 20; suitable for most players with thin gloves (thin gloves have conductive fingers and can operate mobile phones);
- Set to 25; suitable for bare-handed players;
- Set to 7-10; suitable for players with very light force, or players with thick gloves (similar to maimai gloves);
3.1.3. Groundslider delay
Section titled “3.1.3. Groundslider delay”Precondition: B parameter (delay parameter) in the game, please use your own parameters on the arcade (Japanese cab or International cab);
- Set 35±2, you can fine-tune according to the feeling of use; suitable for home 120Hz display, normally play on International cab 60Hz.
- Set 0~2, it is recommended to set the initial value to 2; suitable for home 120Hz display, normally play on Japanese cab 120Hz.
3.1.4. Groundslider light brightness
Section titled “3.1.4. Groundslider light brightness”Adjust according to your own preferences, the recommended range is 70-100;
3.1.5. AIR light brightness
Section titled “3.1.5. AIR light brightness”- If it is a computer USB2.0 type-A interface, it is recommended to adjust the brightness to less than 70;
- If it is a computer or charger USB3.0 type-A interface, the brightness can be adjusted at will;
- If it is a CtoC cable, the brightness can be adjusted at will (usually CtoC cables will provide 5V/3A capabilities);
3.1.6. In-game settings (important)
Section titled “3.1.6. In-game settings (important)”- Use your own A B parameters on the arcade;
- If Fast is too much, increase the delay on Options;
- If Late is too much, reduce the delay on Options;
3.2 Advanced Settings
Section titled “3.2 Advanced Settings”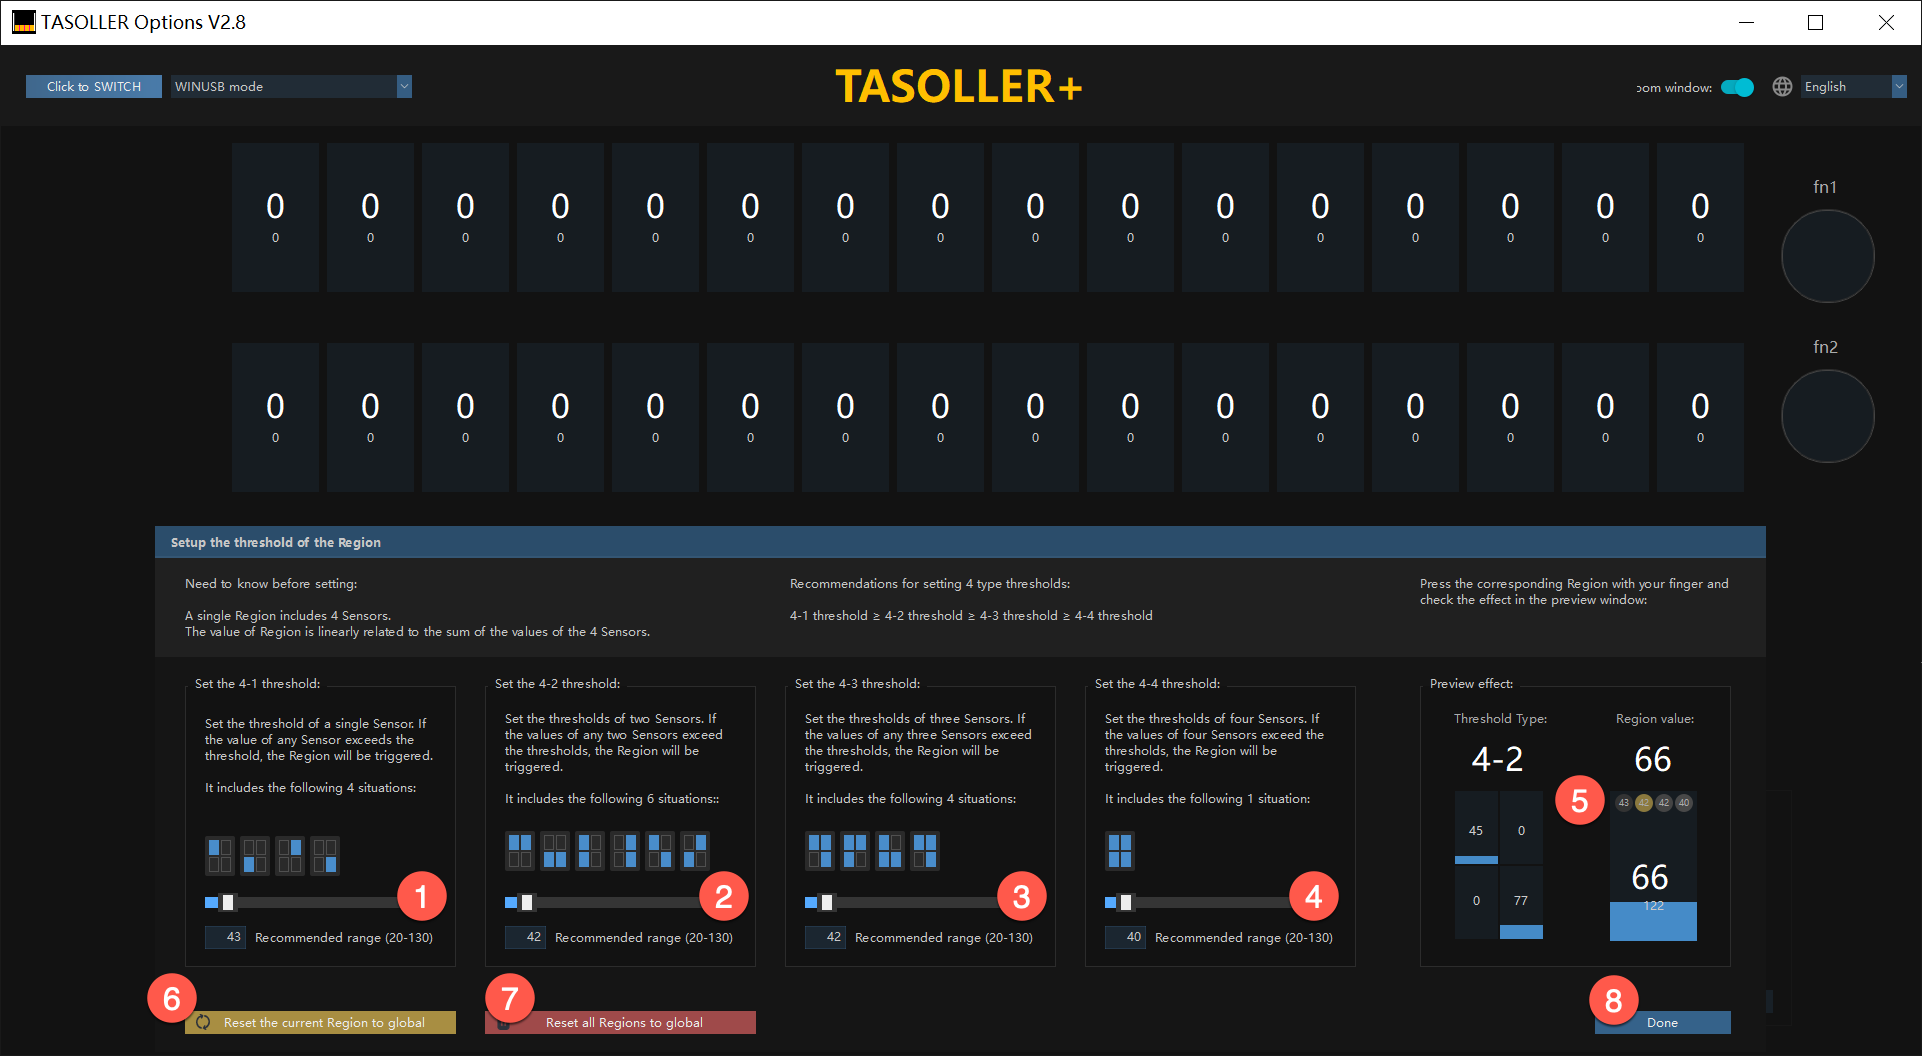
| No. | Function | Technical Description |
|---|---|---|
| 1 | Case 1 Threshold | After setting the threshold, the overall threshold will no longer affect this button. |
| 2 | Case 2 Threshold | After setting the threshold, the overall threshold will no longer affect this button. |
| 3 | Case 3 Threshold | After setting the threshold, the overall threshold will no longer affect this button. |
| 4 | Case 4 Threshold | After setting the threshold, the overall threshold will no longer affect this button. |
| 5 | Threshold Observation Window | Real-time display of the trigger values of 4 sensors; Used as a reference for settings. |
| 6 | Reset current button to global | Reset the parameters of the current button to the global threshold parameters; |
| 7 | Reset all buttons to global | Reset all modified button parameters to the global threshold parameters; |
| 8 | Done | Click to exit this window |
3.3 Keyboard Mode
Section titled “3.3 Keyboard Mode”3.3.1 Keyboard Mode 4K
Section titled “3.3.1 Keyboard Mode 4K”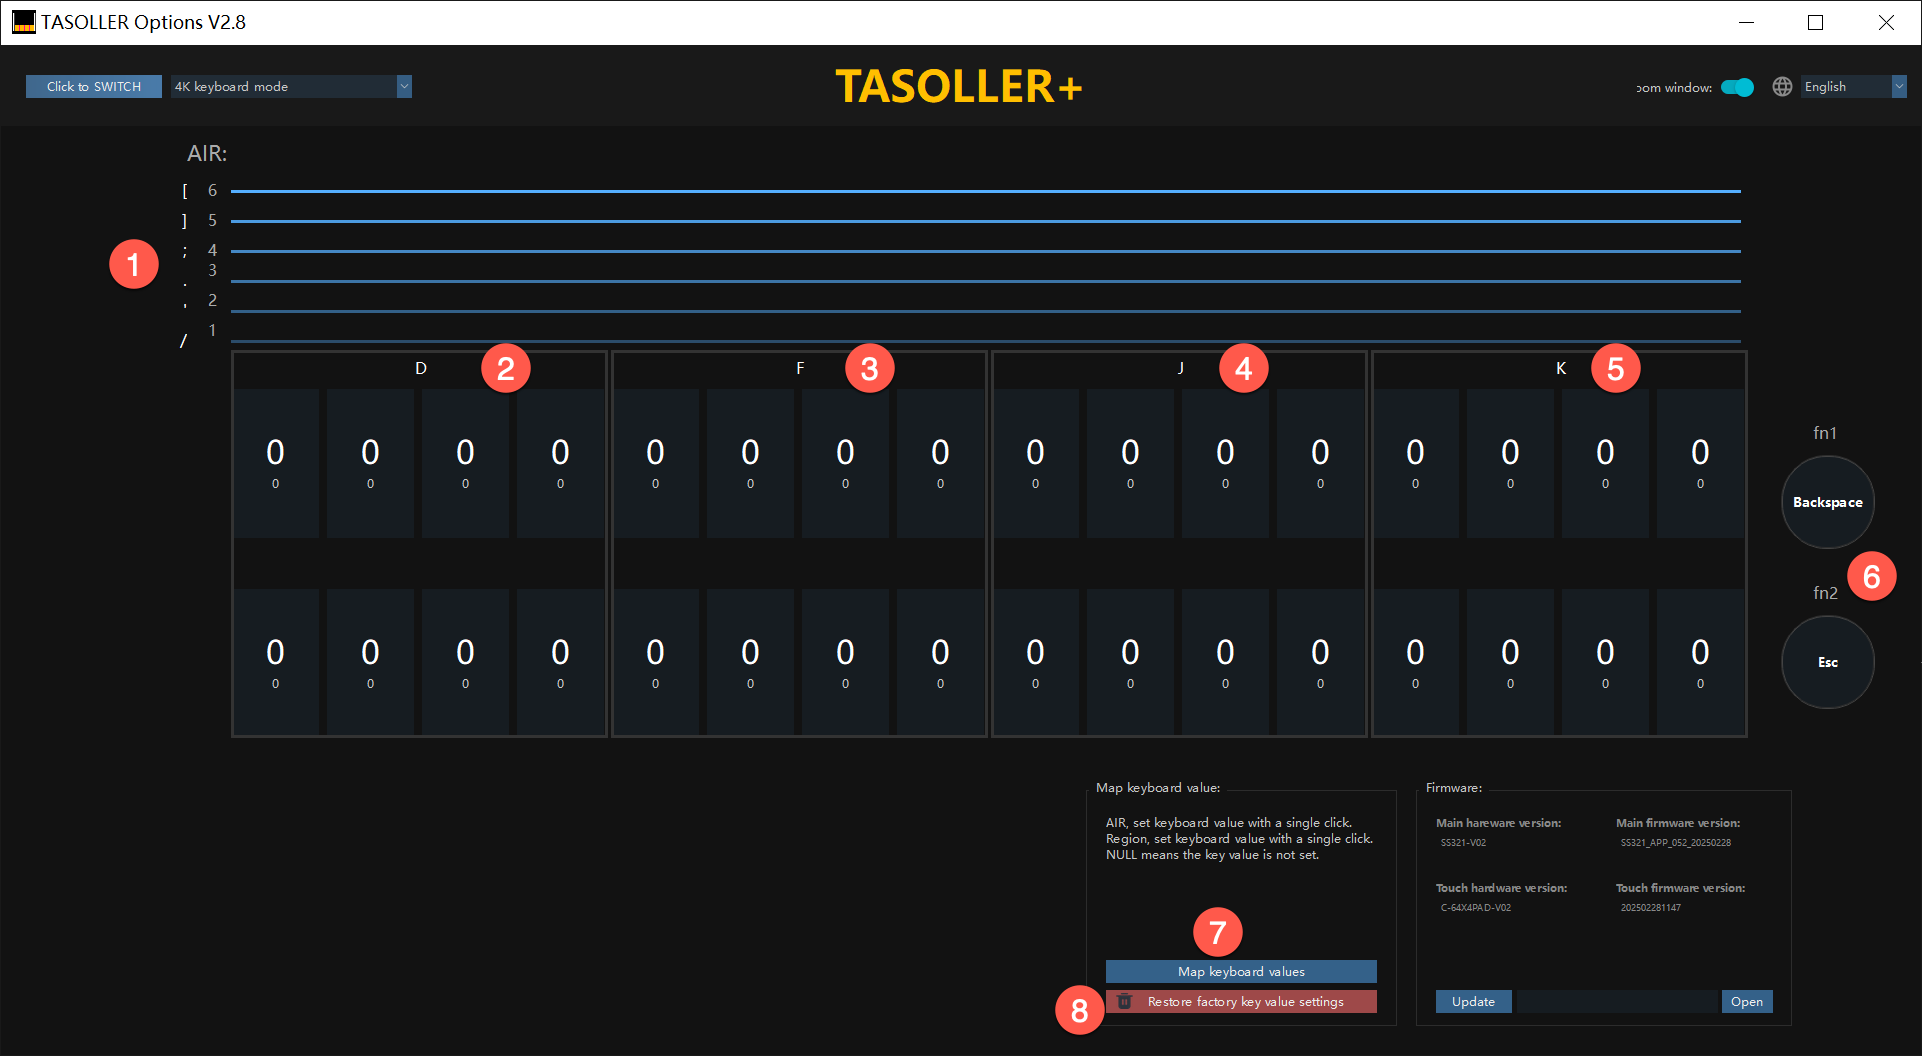
| No. | Function | Technical Description |
|---|---|---|
| 1 | 6 air mappings | The current 6 air-mapped keyboard values; |
| 2 | 4K-1 | All 4 keys output 1 key value; |
| 3 | 4K-2 | All 4 keys output 1 key value; |
| 4 | 4K-3 | All 4 keys output 1 key value; |
| 5 | 4K-4 | All 4 keys output 1 key value; |
| 6 | FN1 and FN2 key values | |
| 7 | Map keyboard values | Click the button, and a pop-up window will appear to map the key values; |
| 8 | Restore factory settings | Click the button to restore the key value mapping in the current mode; |
3.3.2 Setting key value
Section titled “3.3.2 Setting key value”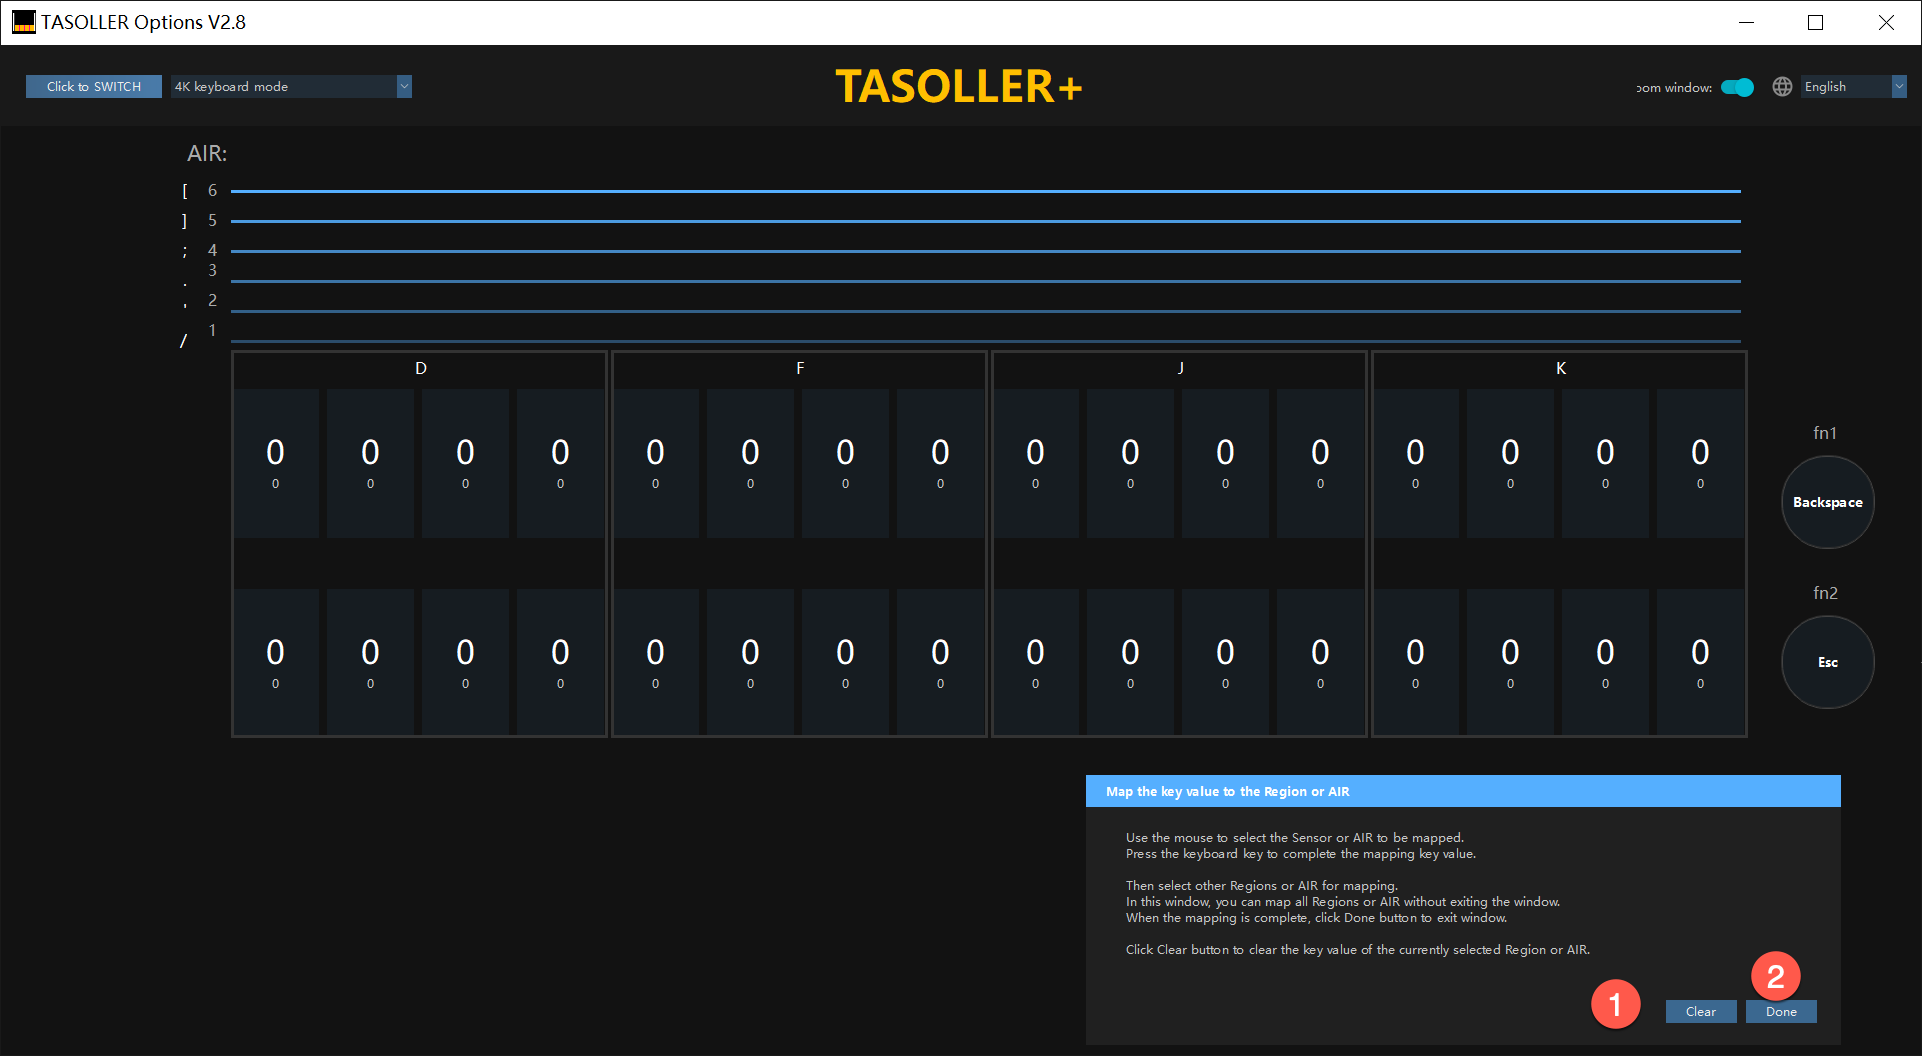
| No. | Function | Technical Description |
|---|---|---|
| 1 | Clear button | - Select the blue line of Air, or touch the button; - Click the Clear button to clear the current key value; - Press any key on the keyboard to complete the key value setting; |
| 2 | Done | After setting all the keys, click Finish to exit the setting; |
3.3.3 Keyboard Mode 8K
Section titled “3.3.3 Keyboard Mode 8K”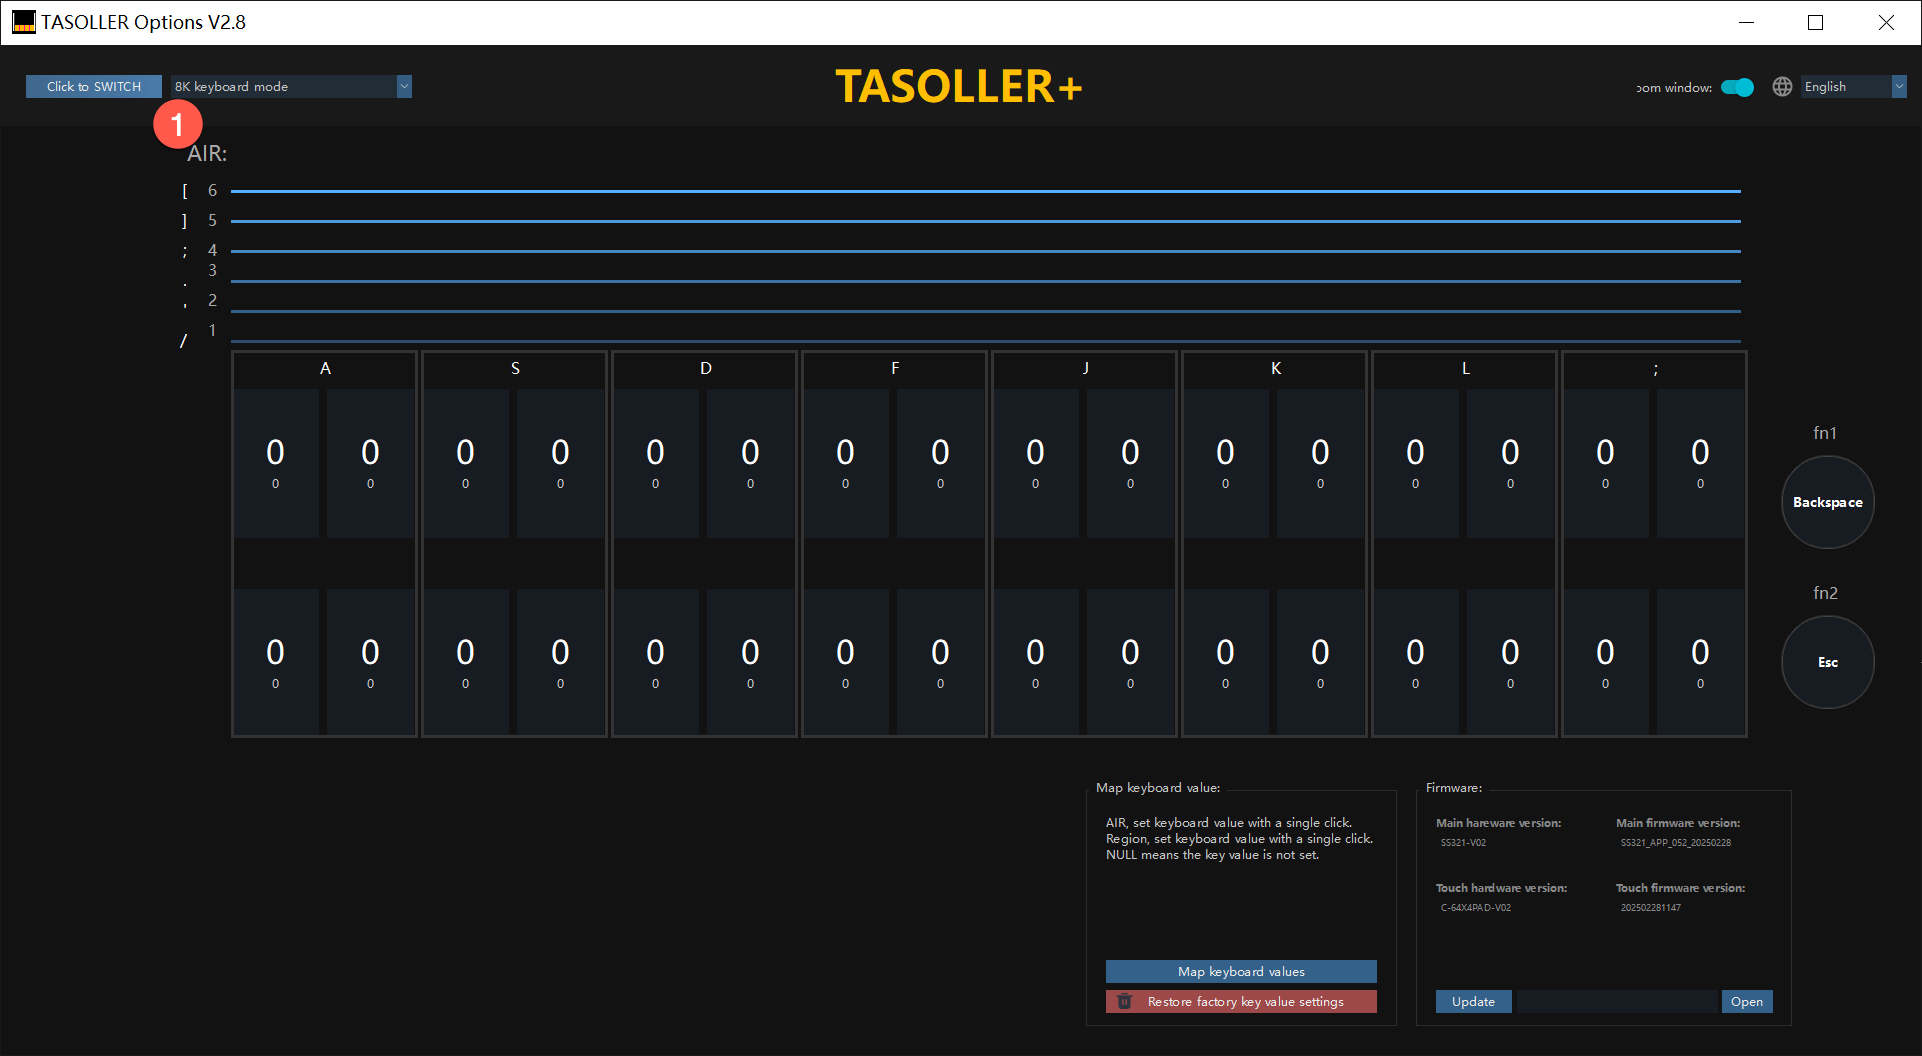
3.3.4 Keyboard Mode 16K
Section titled “3.3.4 Keyboard Mode 16K”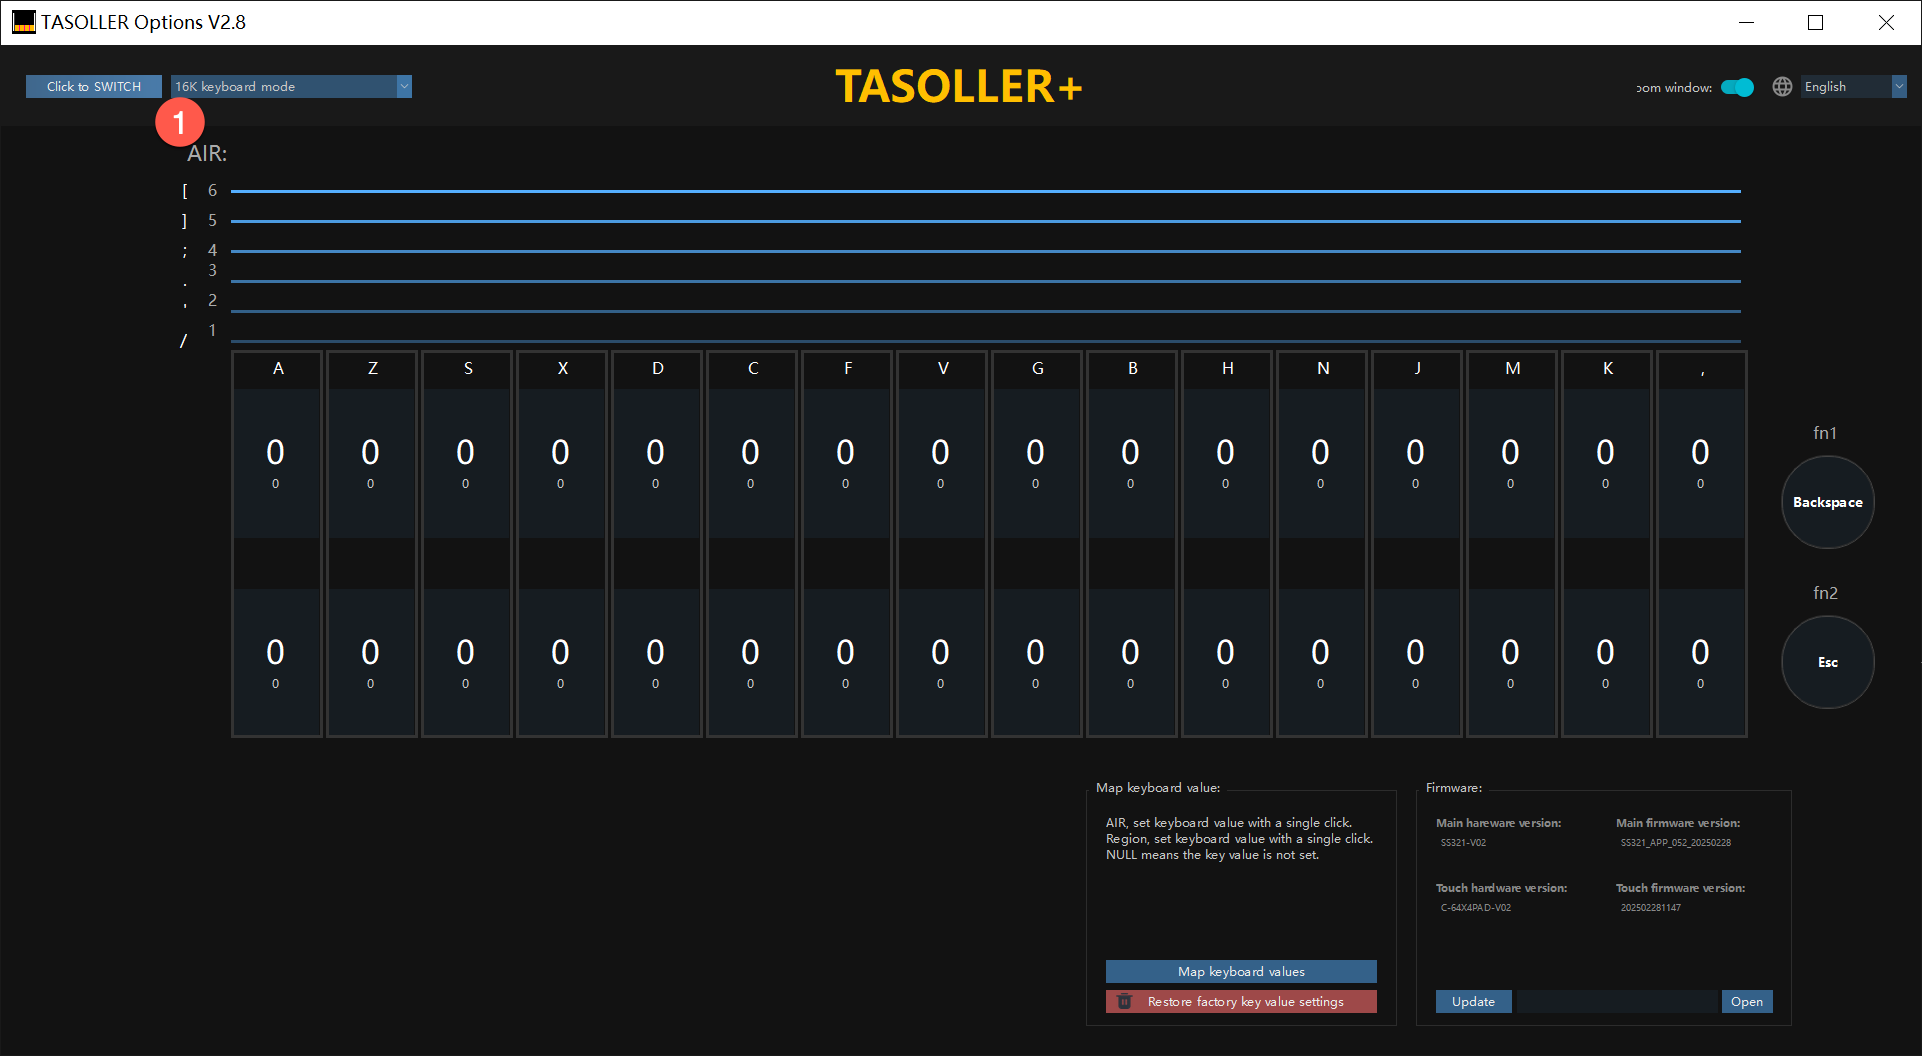
3.3.5 Keyboard Mode 32K
Section titled “3.3.5 Keyboard Mode 32K”
4. FAQ
Section titled “4. FAQ”What are the functions of FN1 and FN2?
- Single-click FN1, TEST;
- Single-click FN2, Service;
- Double-click FN2, a green progress bar appears, and the quick Ground Slider calibration function is used to solve the sticky key problem (it takes about 5 seconds);
- Triple-click FN2, a red progress bar appears, and the deep Ground Slider calibration function is used to solve the sticky key problem (it takes about 10 seconds);
Calibration function (parameters remain unchanged, the judgment in the game is normal sometimes and abnormal sometimes)
- Exclude game settings, graphics card settings, background programs, and Windows automatic upgrades;
- Double-click FN2, the radio will have a green progress bar for about 5 seconds to calibrate; try again after calibration;
- If double-clicking FN2 does not solve the problem, try triple-clicking FN2;
- Triple-click FN2, the radio will have a red progress bar for about 10 seconds to calibrate; try again after calibration;
What to do if a key is stuck (the key is still pressed even though the hand is released)
- Make sure the gloves are not too wet (use your bare hands first to see if the keys are sticky/stuck. If the bare hands are normal, then change to a pair of dry gloves);
- It is not recommended to use maimai thick gloves;
- It is not recommended to use damaged gloves (damaged gloves contain a lot of oil stains and stains, which will affect the operation of the handheld radio);
- It is dry in winter and prone to static electricity. It is recommended to put a small humidifier next to the controller. 1-1.5 meters away from the controller. If the distance is too close, it will cause side effects similar to [wet gloves];
- What to do if there is no humidifier. Use wet wipes or a damp towel (wring it dry before use) to wipe the controller, and then wipe off excess moisture with toilet paper.
What is the relationship between threshold and sensitivity?
- Threshold refers to the minimum trigger condition for pressing a certain force.
- Threshold and sensitivity are inversely related. The larger the threshold, the less sensitive; the smaller the threshold, the more sensitive;
Why is the threshold in the game test set to 20?
For the game’s hardware, there is a threshold mechanism. They are 20, 40, 60, and 80. This adjustment range is relatively rough, so it is not recommended to adjust the threshold in the game test, and it is fixed to 20.
What is the advanced threshold setting in Options?
This is a debugging function reserved for official technical support and is strongly not recommended for players to use.
© 2026 GAMO2 Docs